jsb-42
The lotus blossom or lily-pad flower, whichever. 36 total holes, about an intermediate bind. Make sure that your holes along the top line are even! As always, if there is an error or if you have a question, leave a comment and I will do my best to answer.

**click on an image to enlarge**

hole pattern
jsb-lotus.holes

sewing pattern

jsb-lotus

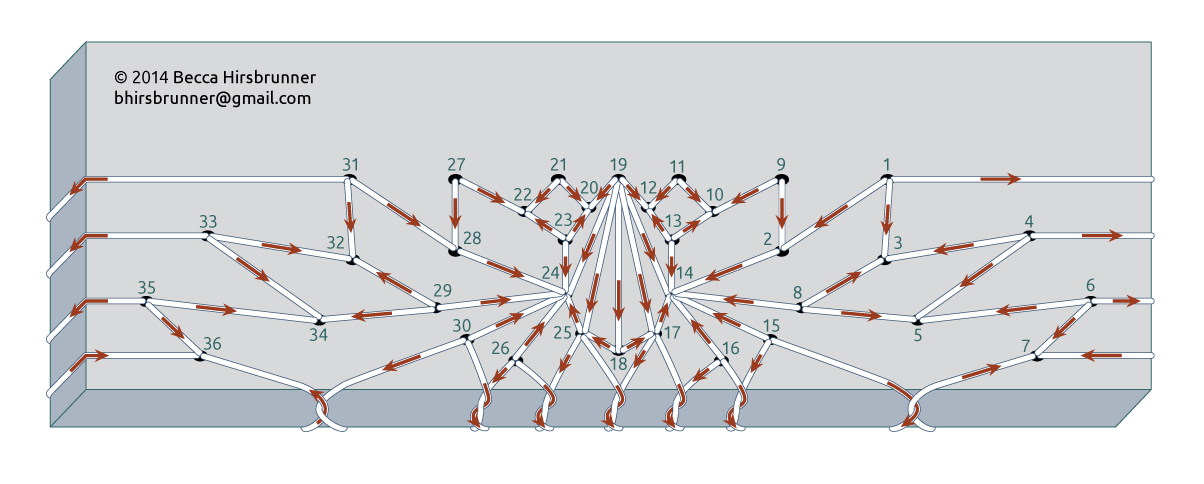
EXIT = needle pointed DOWN and ENTER = needle pointed UP
=====
enter 1, (leave a tail but don’t knot it), wrap around right edge, enter 1 again
exit 3
enter 4, wrap around right edge, enter 4 again
exit 5
enter 6, wrap around right edge, enter 6 again
exit 7, wrap around right edge, exit 7 again
wrap around spine at angle to below 5, exit 7 again
enter 6
exit 5
enter 8
exit 5
enter 4
exit 3
enter 8
exit 3
enter 1
exit 2
enter 9
exit 10
enter 11
exit 12
enter 11
exit 10
enter 13
exit 14
enter 2
exit 14
enter 8
exit 14
enter 15, wrap around spine through loop from 7, point right, enter 15 again
wrap around spine, enter 16
wrap around spine through loop from 15, point left, enter 15
exit 14
enter 16, wrap around spine, enter 17
wrap around spine through loop from 16, point left, enter 16
exit 14
enter 17, wrap around spine, enter 25
wrap around spine through loop from 17, point left, enter 17
exit 14
enter 13
exit 12
enter 19
exit 14
enter 19
exit 17
enter 18
exit 25
enter 18
exit 17
enter 19
exit 18
enter 19
exit 25
enter 19
exit 24
enter 19
exit 20
enter 23
exit 24
enter 25, wrap around spine, enter 26
wrap around spine through loop from 25, point left, enter 25
exit 24
enter 26, wrap around spine, enter 30
wrap around spine through loop from 26, point left, enter 26 again
exit 24
enter 30, wrap around spine at angle to below 34, enter 30 again
exit 24
enter 29
exit 32
enter 29
exit 34
enter 29
exit 24
enter 28
exit 24
enter 23
exit 22
enter 21
exit 20
enter 21
exit 22
enter 27
exit 28
enter 31
exit 32
enter 33
exit 34
enter 35
exit 36, wrap around spine through loop from 30, point right, exit 36 again
wrap around left edge, exit 36 again
enter 35, wrap around left edge, enter 35 again
exit 34
enter 33, wrap around left edge, enter 33 again
exit 32
enter 31, wrap around left edge, enter 31 again
exit 28
enter 27
exit 22
enter 23
exit 20
enter 19
exit 12
enter 13
exit 10
enter 9
exit 2, tie off

18 responses to “Japanese stab binding tutorial: lotus blossom”

  1. guihermine Avatar

    Thank you sooo much for your amazing tuto. Your binding are beautiful.
    Emilie from France.

  2. Ineke Hooghuis Avatar
    Ineke Hooghuis

    Hi Becca,

    Just finished a booklet with the maple leaves for my sister. She really loved it! I will send you a picture of it soon. Did not make a book for more than 1 year. But now I’m inspired again and I would like to try the lotus blossom. The only thing I don’t like about this design are the edge wraps. I think it would probably be much more beautiful without. Do you think they are necessary for any reason or can I leave them out?
    I love to hear from you.

    Warm regards
    Ineke

    PS: I’m also very interested in the hot air balloons. You said once in a comment that you only had the instructions for that design. Are that the sawing instructions? If so, would you be so kind to share them?

    1. Becca Avatar

      Hey Ineke!
      The side wraps help the structure of the book and is part of the style, but since the lotus bind has so many other holes, I think it would be fine to ignore them.
      For the hot air balloons… I do have written instructions (unchecked for errors), but no picture to go with them. Just my original rough planning sketch. If you want to give it a go anyway, send me an email and I’ll give them to you.

  3. Linnea Avatar
    Linnea

    Thank you for this! I made a booklet using this pattern, last night, and it turned out really well. I printed out a screenshot of the hole pattern and used that as a template for making the holes. I also printed out the instruction so I could mark each step with a pencil as I had done it… I would probably have missed steps otherwise.

    There is a minor error in the description: “enter 35, wrap around left edge, exit 35 again” should be “enter 35 again” – that felt rather obvious when I was at that point because you can see what you need to do, but it made me briefly confused. :-)

    1. Becca Avatar

      Ooops! Thanks so much for pointing it out. :)

  4. techne9 Avatar
  5. Jacob Diegel Avatar
    Jacob Diegel

    How far apart would all the holes be from each other and the edges?
    Also would I be able to bind a book with a wooden cover with this pattern?

    P.S. really like the design I am trying to make a sketch book for my friends birthday

    1. Becca Avatar

      Hi Jacob,
      A good rule of thumb is to keep all holes a minimum of .25″/6mm from each other and the edge. What are the dimensions of the sketchbook? You could try printing out the hole pattern and enlarging it if necessary, to know where to place the holes. A wooden cover would be awesome! I’m guessing you have some kind of drill to make the holes? The one thing you have to consider is the top cover… it will have to have a gap between binding and the rest of the board in order to open. Kind of like this one by Ruth Bleakley or kind of like this one. You could choose to glue the two pieces to a durable piece of paper, or you could glue bookcloth over the edge piece and the gap to connect the two wooden pieces. Does that make sense?

  6. […] There are many places to learn the Japanese Stab Binding. Many introductory books on binding techniques include it. The ibookbinding website lists their top 15 instructions here. I first learned it from Japanese Bookbinding by Kojiro Ikegami. (If you want to know a bit about this book, I wrote about it here.) If you are interested in exploring the decorative possibilities of the stab binding, Becca Making Faces has some detailed tutorials for ornamental stitching. […]

  7. Dawn Kalies Avatar
    Dawn Kalies

    I just finished stitching a mock-up of the lotus blossom on foam core. I am so psyched! This was the 1st design from your website I tried. Tomorrow I stitch the butterfly. Your designs are awesome. I learned so much just by following the directions. I would love some insight into your design process as getting the front and back sides identical seems like a magical design mystery to me. I just love that you posted all these stab bindings. I do suminagashi marbling and some of these stab bindings will be the frosting on the cake for them for my next books. Sounds like you’re creatively super busy, but would love the knotted design some day. Blessings to you, your family, & your art. Thanks much!

    1. Becca Avatar

      Thanks, Dawn! Have you read my ‘theory of Japanese stab binding’ page? It explains a little more how to get the same front and back designs. https://beccamakingfaces.com/theory-of-japanese-stab-binding/

  8. Ash Roth Avatar
    Ash Roth

    Hello Becca,

    I love you’re designs, they are stunning. Would you mind if I were to sell any of the books I make with your bindings if I credit you?

    1. Becca Avatar

      Hi Ash, sure that’s fine. Credits are great!

  9. Japanese Stab Binding – Anna Platz-Twells's Art Blog Avatar

    […] have also tried more complex stitch patterns, inspired by this blog. I tried the ‘tiara stitch’ (in pink) which required more thread than I anticipated, […]

  10. […] I chose the binding pattern from Becca Hirsbrunner’s extensive library of tutorials. The lotus blossom worked well. It doesn’t have too many holes and echoed the Nepalese feeling of the book. […]

  11. […] would like to experiment with sewing fancy patterns onto the spine of your stab binding, I think Becca Making Faces is an excellent resource for both patterns and […]

  12. thegrowingofmelons Avatar

    Thanks so much. I lack dexterity and acumen so I’m bound to stab myself a little despite the clarity of your design, and it’s worth it to stab myself a little since eventually I’m bound to succeed.

Leave a comment

I’m Becca!

Welcome to Becca Making Faces, a blog that started out as a grad school project and has become a place where I post experiments in Japanese stab binding.

Have a look around, and let me know if you have any questions!

Let’s connect