I’ll be honest, I’ve been working on this tutorial for days. It might be the most convoluted one. I’ve checked and double-checked for errors. If you find one, leave a comment and I’ll fix it as soon as I can.
But ‘woven’ is not that difficult to sew once you understand the technique. If you’ve tried the marionette tutorial, then you could sew this bind with that method. However…if you can figure this technique out, it will give you more options! The ‘woven’ part will actually be partially over the spine edge – though the diagram doesn’t show it well. I rate this pattern somewhere in the intermediate range, with beginning holes.
A few things to remember: when you are making the first diagonal Xs, do not make the knot too tight. Also, leave a bit of slack in the first three Xs. Your fingers will thank you when you try to thread the needle under the massive knot to make the last X between holes 16 and 20. If when you first read the pattern and can’t visualize what to do, just think how an X is written… you sew the first diagonal from the beginning hole to the matching hole on the opposite side of the pattern, and then complete the X on the way back to the original hole. Clear as mud? Well – jump in and try it and hopefully it will make sense!
 sewing pattern
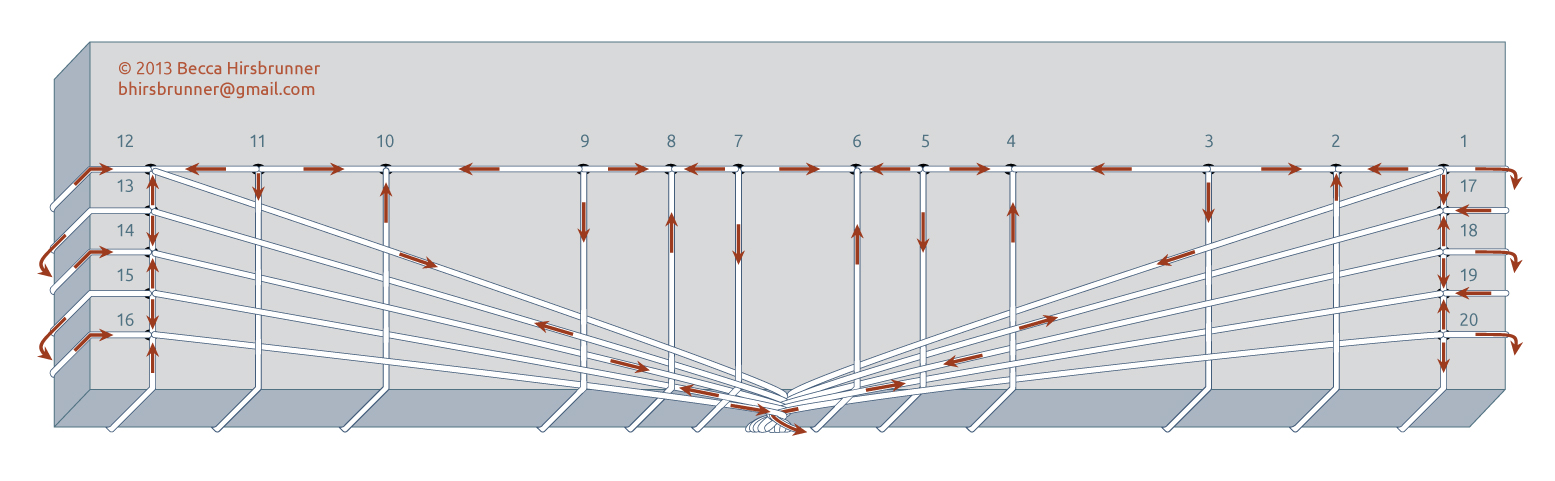
EXIT = needle pointed DOWN and ENTER = needle pointed UP
=====
enter 1, (leave a tail but don’t knot it) wrap around right side, enter 1 again
exit 2, wrap around spine, exit 2 again
enter 3, wrap around spine, enter 3 again
exit 4, wrap around spine, exit 4 again
enter 5, wrap around spine, enter 5 again
exit 6, wrap around spine, exit 6 again
enter 7, wrap around spine, enter 7 again
exit 8, wrap around spine, exit 8 again
enter 9, wrap around spine, enter 9 again
exit 10, wrap around spine, exit 10 again
enter 11, wrap around spine, enter 11 again
exit 12, wrap around left side, exit 12 again
enter 13, wrap around left side, enter 13 again
exit 14, wrap around left side, exit 14 again
enter 15, wrap around left side, enter 15 again
exit 16, wrap around left side, exit 16 again
wrap around spine, exit 16 again
enter 15
exit 14
enter 13
exit 12
enter 11
exit 10
enter 9
exit 8
enter 7
exit 6
enter 5
exit 4
enter 3
exit 2
enter 1, thread needle under 2, over 3, under 4, over 5, under 6, at angle to between 6 and 7; *opposite side* thread needle under 7, over 8, under 9, over 10, under 11
enter 12, thread needle under 11, over 10, under 9, over 8, under 7; thread needle backward (point left) under loop from 1, pull to the right (knot/twist should be vertical), *opposite side* thread needle under 6, over 5, under 4, over 3, under 2
enter 1
exit 17, thread needle over 2, under 3, over 4, under 5, over 6, thread needle under knot/twist between 6 and 7, point right, *opposite side* thread needle over 7, under 8, over 9, under 10, over 11
exit 13, thread needle over 11, under 10, over 9, under 8, over 7, thread needle under twist between 7 and 6, point left, *opposite side* thread needle over 6, under 5, over 4, under 3, over 2
exit 17
enter 18, thread needle under 2, over 3, under 4, over 5, under 6, thread needle under twist between 6 and 7, point right, *opposite side* thread needle under 7, over 8, under 9, over 10, under 11
enter 14, thread needle under 11, over 10, under 9, over 8, under 7, thread needle under twist between 7 and 6, point left, *opposite side* thread needle under 6, over 5, under 4, over 3, under 2
enter 18
exit 19, thread needle over 2, under 3, over 4, under 5, over 6, thread needle under twist between 6 and 7, point right, *opposite side* thread needle over 7, under 8, over 9, under 10, over 11
exit 15, thread needle over 11, under 10, over 9, under 8, over 7, thread needle under twist between 7 and 6, point left, *opposite side* thread needle over 6, under 5, over 4, under 3, over 2
exit 19
enter 20, thread needle under 2, over 3, under 5, over 5, under 6, **thread needle under twist between 6 and 7, don’t wrap knot,** *opposite side* thread needle under 7, over 8, under 9, over 10, under 11
enter 16, thread needle under 11, over 10, under 9, over 8, under 7, ••thread needle under twist between 7 and 6, don’t wrap knot,** *opposite side* under 6, over 5, under 4, over 3, under 2
enter 20, wrap around spine, enter 20 again,
wrap around right edge, enter 20 again
exit 19, wrap around right edge, exit 19 again,
enter 18, wrap around right edge, enter 18 again
exit 17, wrap around right edge, exit 17 again
tie off

Leave a comment