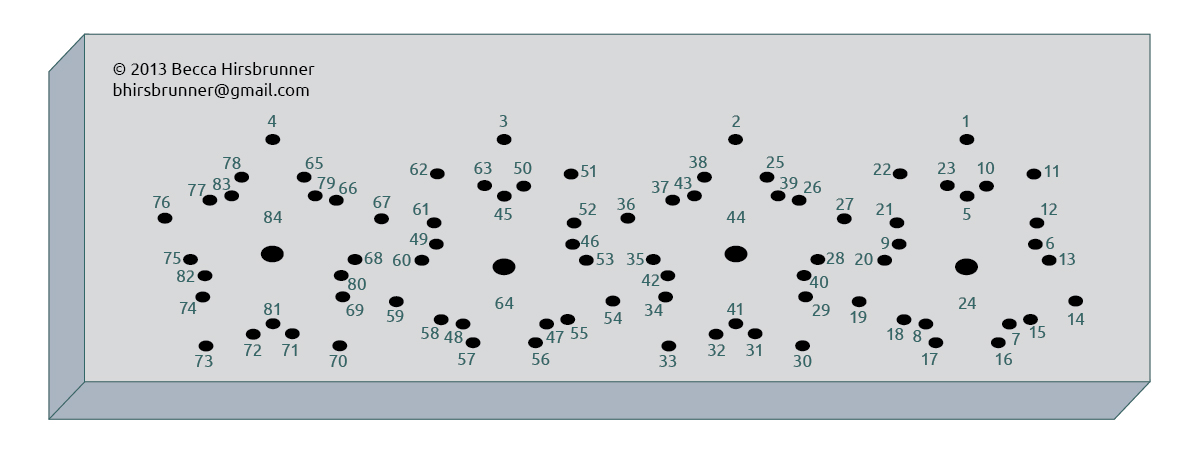
 This bind has 84 holes, which makes it more complicated than it might be otherwise. Also, holes 24, 44, 64, and 84 need to be much larger than the others because there are 15 threads entering and exiting.
The tutorial was a bit complicated to write (though I don’t think it is as difficult to sew)…so if you find an error, please leave me a comment and I’ll correct it. I also broke up the written instructions so you can see where one snowflake ends and the next begins.
**click to enlarge**
hole pattern
sewing pattern
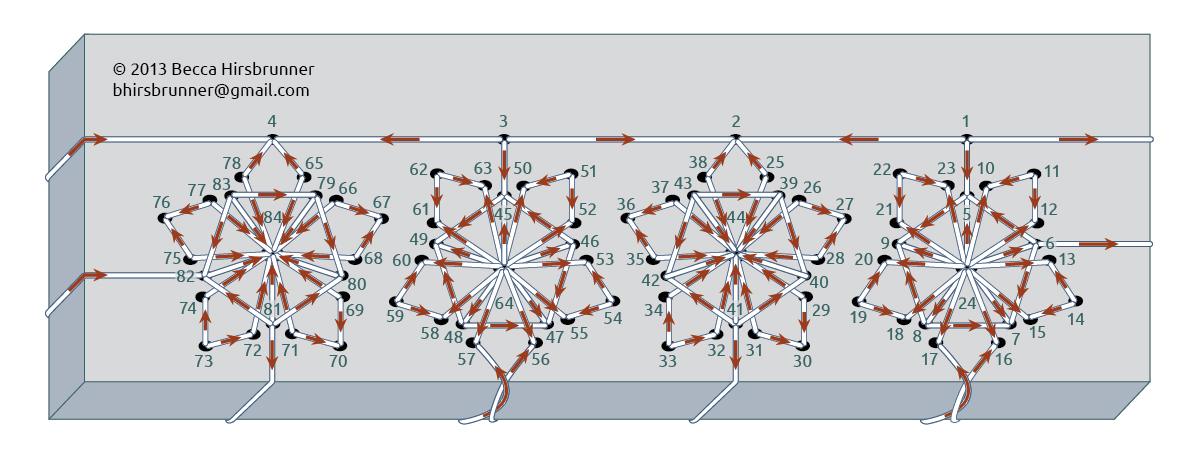
EXIT = needle pointed DOWN and ENTER = needle pointed UP
=====
enter 1, leave a tail but don’t knot it, wrap around right edge, enter 1 again
exit 5,
enter 6, wrap around right edge, enter 6 again
exit 7
enter 8
exit 9
enter 5
exit 9
enter 8
exit 7
enter 6
exit 5
enter 24
exit 6
enter 24
exit 7
enter 24
exit 8
enter 24
exit 9
enter 24
exit 10
enter 11
exit 12
enter 24
exit 12
enter 11
exit 10
enter 24
exit 13
enter 14
exit 15
enter 24
exit 15
enter 14
exit 13
enter 24
exit 16, wrap around spine at angle to below 24, exit 16 again
enter 24
exit 17, thread needle through loop from 16, point right, exit 17 again
enter 24
exit 18
enter 19
exit 20
enter 24
exit 20
enter 19
exit 18
enter 24
exit 21
enter 22
exit 23
enter 24
exit 23
enter 22
exit 21
enter 24
exit 5
enter 1
exit 2
enter 25
exit 44
enter 38
exit 2
enter 38
exit 44
enter 26
exit 27
enter 28
exit 44
enter 28
exit 27
enter 26
exit 44
enter 29
exit 30
enter 31
exit 44
enter 31
exit 30
enter 29
exit 44
enter 32
exit 33
enter 34
exit 44
enter 34
exit 33
enter 32
exit 44
enter 35
exit 36
enter 37
exit 44
enter 37
exit 36
enter 35
exit 44
enter 39
exit 40
enter 41, wrap around spine, enter 41 again
exit 42
enter 43
exit 39
enter 43
exit 42
enter 41
exit 40
enter 39
exit 44
enter 40
exit 44
enter 41
exit 44
enter 42
exit 44
enter 43
exit 44
(opposite side, weave needle under thread coming from 39 and 43) enter 25
exit 2
enter 3
exit 45
enter 46
exit 47
enter 48
exit 49
enter 45
exit 49
enter 48
exit 47
enter 46
exit 45
enter 64
exit 46
enter 64
exit 47
enter 64
exit 48
enter 64
exit 49
enter 64
exit 50
enter 51
exit 52
enter 64
exit 52
enter 51
exit 50
enter 64
exit 53
enter 54
exit 55
enter 64
exit 55
enter 54
exit 53
enter 64
exit 56, wrap around spine at angle to below 64, exit 56 again
enter 64
exit 57, thread needle through loop from 56, point right, exit 57 again
enter 64
exit 58
enter 59
exit 60
enter 64
exit 60
enter 59
exit 58
enter 64
exti 61
enter 62
exit 63
enter 64
exit 63
enter 62
exit 61
enter 64
exit 45
enter 3
exit 4
enter 65
exit 84
enter 78
exit 4
enter 78
exit 84
enter 66
exit 67
enter 68
exit 84
enter 68
exit 67
enter 66
exit 84
enter 69
exit 70
enter 71
exit 84
enter 71
exit 70
enter 69
exit 84
enter 72
exit 73
enter 74
exit 84
enter 74
exit 73
enter 72
exit 84
enter 75
exit 76
enter 77
exit 84
enter 77
exit 76
enter 75
exit 84
enter 79
exit 80
enter 81, wrap around spine, enter 81 again
exit 82, wrap around left edge, exit 82 again
enter 83
exit 79
enter 83
exit 82
enter 81
exit 80
enter 79
exit 84
enter 80
exit 84
enter 81
exit 84
enter 82
exit 84
enter 83
exit 84
(opposite side, weave needle under thread coming from 79 and 83) enter 65
exit 4, wrap around left edge, exit 4 again
enter 3,
exit 2, tie off


Leave a comment